


This post is the latest in our series on scrappy marketing – an approach can help you achieve better results in less time.
-
- What exactly is scrappy marketing and the benefits it brings.
- Scrappy approaches you can take to accelerate your marketing.
- How to make your marketing team more agile in preparation for a scrappy approach.
- Ways you can use external data for inspiration.
- Ways to use your own customer data to surface ideas for marketing activity.
So what should you do next after reading this all? If you’re lucky, this information might have provided the ‘lightbulb moment’ that has allowed you to identify the content and the steps needed for your next campaign – if so, great! You should get started and not waste any more time than is necessary.
That being said, you might need more structure to bring these ideas together into a tangible plan of action. If so, running a brainstorming session that has a clear objective at the end of it can help you get to that position. Without doubt, if you want to know how to brainstorm content marketing ideas, now’s the time!

That being said, prioritize speed over rigidly following a process. The faster you can pull a campaign together, the quicker you will see results and be able to iterate accordingly.
What Is Content Brainstorming?
Content brainstorming is the process of exploring new content ideas, whether individually or in a group, and is imperative to craft an effective content marketing strategy. Enabling creativity to meet strategy, a content marketing brainstorm helps to inspire, generate and refine content concepts, helping businesses to create content that will resonate with their target audience.
How can brainstorming help with content marketing?

On its own, a content marketing brainstorm session can offer the following benefits:
-
- It can help bring your team together and energize them for further action. As such, you can inspire your co-workers to drive results quickly.
- If you need more ideas, brainstorming allows for divergent thinking – taking the information you have and thinking of the possible ways to generate results.
- For those who want a concrete plan, brainstorming can also assist with convergent thinking – taking all your threads and choosing a plan of action. It’s this final step of convergent thinking that will help turn a laundry list of ideas into a concrete series of next steps.
Our content marketing checklist below aims to cover all of these.
The Six-Step Checklist for a Content Marketing Brainstorm Session

We’ve broken up how you can run a brainstorming session that will provide you with a plan of action based loosely on David Allen’s Natural Planning Model from the book Getting Things Done.
While the below is focused on running a session with a team, there’s no reason why you can’t adapt the steps as an individual. We’ve provided a content marketing guide that meshes with your needs, whatever they may be.
1. Prepare the brainstorm session
Preparing your content brainstorming session in advance will help you ensure it is a success. Follow the below steps to get things off on the right foot.
-
- Choose a time and a place to bring people together. Setting a time in the calendar will help ensure that the right people come together. Make sure any place has enough space and ideally has a whiteboard (or at least a flipchart where the pieces of paper can be torn off and put on the wall).
- Make sure your session is time-limited. Too many internal meetings and creative sessions can stretch beyond a useful period of time. By limiting the amount of time you spend – perhaps to no more than an hour – will emphasize keeping energy levels high and getting to a plan of action, both of which are characteristics of a plan of action.
- Share an agenda with a clear outcome. Sharing an agenda in advance will help set the session’s structure and ensure people come prepared. Your clear outcome should be to leave with a plan and the next actions that you can put in play.
- Set the ground rule for deciding on the chosen plan. In a group activity, there is a chance that you won’t gain consensus on the right approach. To avoid this, set a ground rule for how you’ll decide. A suggestion included in this checklist is to have the group add a tally mark to any ideas but on the board.
- Assemble your information and bring equipment for the session. Tell people to bring any insights that you may have gathered previously, whether from external sources or from your own customer insight. If you will use a whiteboard (as suggested below), bring pens, Post-Its and any other material that will help get ideas together.
2. Start the session by agreeing on a goal that your plan should achieve
Brainstorming content marketing ideas will be far more effective with a clear objective.
-
- Restate the outcome. So everyone is clear, make sure you emphasize that the session aims to develop a plan.
- List out your marketing priorities. While your objective for the session will be to devise a plan of action, ultimately, that’s not an end in itself. What’s the aim of your plan? Listing out your priorities will help you choose. They may include the number of marketing-qualified leads you have to generate, the number of opportunities for sales, or the number of conversations opened with target accounts.
- Choose a SMART goal that meets at least one of those priorities. Setting a specific, measurable, and actionable goal to achieve by a particular time will help focus your ideas accordingly. Remember, part of a scrappy mentality is to deliver outsized results. As such, make sure not to limit yourself — but also make sure that your goal can be achieved quickly enough that you will be able to get results sooner rather than later.
3. Set a loose structure for your plan
-
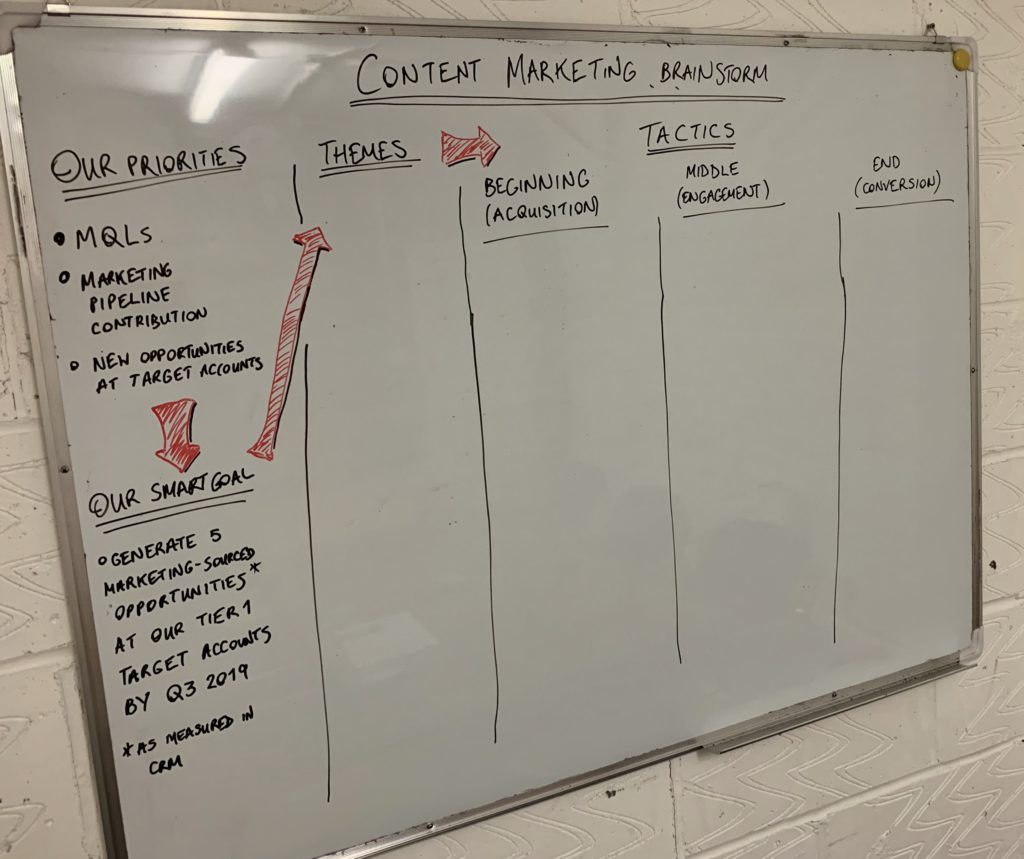
- Differentiate between themes and tactics. Marketing campaigns can be viewed from two different angles – a creative or messaging angle (themes) and the approaches you’ll take to get there (tactics). Your brainstorm will produce both, but it’s important to distinguish between the two. To help with this, you might find it helpful to divide your whiteboard initially into these two blocks.
- Identify what stages your campaign needs. Any quality marketing campaign doesn’t consist of just one touch. At its most basic level, you need to think of how you’ll acquire prospects, how they will engage, and what happens after that (often a conversion of some kind, but there may be several steps involved – particularly if you are looking to nurture prospects over some time). A very simple method might be to split one particular campaign into three sections: beginning, middle and end. For a webinar, this will likely consist of how you’ll drive registrations, engage them as they watch, and the follow-up activity.
- Draw out a column for each stage on a whiteboard (or a large piece of paper). If you’re in a meeting room with a whiteboard, break up the ‘tactics’ section into these sections. During the actual brainstorming part, you can have your team add their ideas on Post-Its, which you can then put into each part.
4. Start brainstorming for ideas
After you’ve run through the above steps, your whiteboard might look something like the below:
The next part is to start creating diverse, exciting content marketing ideas to fill this out into a plan of action. This part is the divergent element of the session.
-
- Collate any information you’ve already been able to gather. Make sure all those ideas and data points that you’ve been able to gather prior to the session are laid out for people to see.
- Get your team to write down as many theme ideas as they can. Set a timer, and let them loose on the messages and angles that might resonate with your target audience to reach your goal.
- Get your team to write down any tactical ideas as they can. Set another timer, and get them to write down the tactics you might employ in line with any themes.
Put these all on the whiteboard. So everyone can see the ideas, make sure they are visible for those looking.
5. Explain, assess and order the content ideas
This part of the session is the convergent aspect – where ideas come together in an order that will help you take action.
-
- Ask each person to explain the ideas they’ve put on the whiteboard. A small Post-It might not describe the full context of what they’ve written down.
- Choose which ones to move forward with. If you want your team to vote, a straightforward approach is to ask them to put a tally mark on their favorite ideas. Those with the most tally marks will be the ones you move forward with.
- Confirm the plan. If you’ve taken the voting method, you’ll know the themes you’ll cover and the tactics to use. Congratulations! This is the foundation of your plan. Say this out loud so everyone is clear on the approach.
- Save the other ideas. You will have spent much creative effort on getting these ideas together, so don’t waste them! Take a photograph or save the Post-Its to help with the next campaign.
6. List the next actions
It’s now time to put the plan into action without delay. This final step is where the effectiveness of your content marketing brainstorm framework comes into play!
-
- Write down at least five next steps to put this into play. You may be able to plan out all the actions required to bring your plan to fruition, but if not, make sure you list at least five next steps you’ll need to take.
- Assign these next steps to team members with a completion date. Make sure each of the next steps has an owner and a deadline for completion.
- Set a check-in date. While this doesn’t need to be a full meeting, you’ll want to ensure that the other day-to-day demands on your team don’t take over any plan.
- Optional – set a retrospective date. So you can learn moving forward, it can be helpful to review your plan to find out whether you achieved your goal, what worked well and what can be improved.
How to effectively brainstorm content ideas

-
- Be pragmatic. Run with what works. The above steps aren’t all mandatory – and following them rigidly can eat into the sense of agility that you should look to encourage in a team.
- Make it fun! All too often, group sessions can leave people with lower energy than they started with. As such, make sure to frame it as a fun exercise. You may find it helpful to ask someone with facilitation skills to help bring it together.
- Keep in mind ‘always on’ marketing. Make sure you’re not creating one-hit wonders when it comes to brainstorming your content marketing. From any plan you develop, you’ll want to use it as the foundation for continuous improvement. While this learning can help you re-run the plan, considering ‘always on’ approaches can help you create systems that continue to pay dividends long after they’ve been created.